


The beautiful thing about astrophotography is that the effects of imaging are additive. You can essentially shoot the same object, night after night, even with different cameras and telescopes, and combine all the images into one fantastic final image.
But, some careful attention needs to be paid to each imaging session to ensure that when you integrate them all together you don’t have any issues. Primarily, this means shooting your main images, you need a good set of flats for each session, and comparable darks and bias that match your gain and offset settings of your light images.

This was the set of folders I had on my hard drive after shooting the galaxy. I shot 3 sessions, and two were back to back, so I was able to create one set of flats for session 1 and 1 for sessions 2 and 3.
Between the first imaging session and sessions 2 and 3, and extra piece of dust appeared on the camera sensor. I tried to cheat, and I initially processed all the images with only the first sessions flats, but that single stray piece of dust left a blemish in my final integrated images. So I had to reprocess the entire thing again using two sets of flats. Thankfully, this worked.
After you have your images organized by folder session and type of image, you can begin to load them into Astro Pixel Processor. Start up the application, and choose the root folder where all your images are saved.

Select the load tab, make sure that multisession processing is selected. If you have a color camera, you might want to go to tab 0 RAW/FITS and set “force Bayer CFA” and pick the pattern that matches your color camera. I use the ZWO ASI071MC-Pro camera in this tutorial, so the pattern I set is RGGB.
Back on the Load tab, I select the light button and navigate to my session 1 light frame folder and choose all the light frames from there. Once I press OK, Astro Pixel Processor will ask me what session this was. I pick “session 1”, and select ok. You will see the number of lights indicated to the right of the light button. Pressing the light button again, you can now navigate to your session 2 light folder, and choose all the images there. After pressing ok, it will again ask which session, this time pick session 2. Now you will see the total number of lights has increased by the number of lights you just added.
Next up is flats. Press the Flat button, and navigate to your flats session 1 folder, and choose all the images. APP will then ask you which session those flats belong to. You’ll pick session 1. Then to add more flats for the other sessions, you’ll repeat the process. For the second flats in my scenario, I had a session 2 and 3, so after selecting the flats for those sessions, I was able to choose to apply them to both sessions 2 and 3 in the screen after adding the images.
Finally, I added a master dark, master bias, and bad pixel map I had from previous sessions. Since no light is involved in creating them, they can be reused any time you shoot so long as they match the same length time, gain, and bias as your light images.
From here, I go directly to the integrate tab, leaving all the default settings in tabs 2-5. Here under multi-session options, I pick Integrate all. This produces one final stacked image from all imaging sessions. Alternatively you can set integrate per session, and this will leave you with a stacked image for each session. In my case I would end up with three final images that still need to be combined. So I just choose to integrate them all.
There are only three further settings on tab 6 that I set. One is I reduce the total number of lights to stack down to about 90% of the total. This removes the 10% worst images from all my imaging sessions based on their overall quality. Sometimes you might have a gust of wind, or a cable that drags causing elongated stars in a few of your images. Or maybe a stray cloud came in for a few frames. This helps get rid of any of those bad images. Right underneath that slider, I change the weights setting to Quality. This stacks all the images according to the quality. In any given imaging session all your images get ranked from best to worst. This feature will make sure that the best images are weighted higher than the worst images when stacking, meaning that the worst images have less overall impact on the final output than the best images would have. Finally, I change the Outlier Rejection filter setting to Windsor clip. This eliminates stray satellites, airplane lights, and other anomalies that might appear outside of the normal content of the image while still keeping the good parts of those images.
You’re all set to press the integrate button at the bottom of that tab. APP will now run through and calibrate, stack all images from all sessions. This may take some time. Go get a drink or snack! I like to set my computer to not sleep during the processing. If the computer falls asleep, processing stops, and you have to wake it up again for the processing to continue. Thankfully it doesn’t make you start over.

This is what my stacked, calibrated image looks like. It might not look that great so far. But what I can tell, is that the flats worked their magic. There are no dust motes in the image that I can see. But I can tell that my images were not all aligned perfectly from each session. They are off by a few arc minutes causing some overlaps at the edges. But this is no problem to deal with. I can load it into the crop tool and crop out the bad areas of the image.
Press tab 9) Tools. Double click your integrated image at the bottom of the files list in the bottom of the APP window. Once it’s loaded, on the tools tab, press batch modify. It should load your image, and provide you with a list of tools to the left. All we’re going to do at this stage is draw a green selection window with our mouse cursor over the area we want to keep.

Press the “Crop ok” button to the left after you’ve drawn your green selection. It will ask you to pick a file type, fits is good. APP saves all edits as a separate file. In your files list at the bottom, you’ll have a new cropped file there. Double click it to load it into the viewer. If like me, you were shooting RGB images, you might have some light pollution. I certainly do. That is the white gradient that is washed over my whole image. I image to the North, directly facing the city of Houston. So there’s always a ton of light pollution I need to get rid of from my images.
I’m now ready to load this cropped image into the Remove Light Pollution tool on the tools tab. Make sure you’ve double clicked the cropped image, and press the remove light pollution button.
Your images loads into the new tool. From here, you’ll begin drawing those green selection boxes. But this time you want to draw small squares all over your image trying to avoid the object you’re taking a picture of. The reason for this is we’re now selecting the light pollution areas of the image.

If you had imaged more than one galaxy or object, you’ll want to omit covering each one with boxes. Make sure you leave enough space around the objects so that you don’t remove any faint trails of light coming off the object. Also, the smaller the boxes you make, the better the light pollution filter is at removing all the light blemishes. Larger boxes don’t remove the gradient as smoothly.

Your final selection should look something like the image above. When you feel you’ve covered all the light pollution, you can press the calculate button. This will show the image with the light pollution removed. If you’re happy with the results, press the OK & Save button. Again, APP makes you create a new file with the light pollution removed.

The image is starting to look decent at this stage. But we’re not done. As you can see, my overall image is quite yellow. This could be from the camera itself, or it could be from the light pollution. But in any case, we need to correct the color of the image. APP has some really nice, easy to use tools for this. But, before we can calibrate the color of our galaxy, we have to get the background calibrated to a neutral state.
Double click your latest image that has the light pollution removed. Select “calibrate background” from the tools tab. This will load your image into the new tool. This time, we draw boxes around any background that should be black. This gets a little more tricky if you have an image of a nebula, because you don’t want to pick any of the nebulosity. Just pick the areas where you know the image should be black.
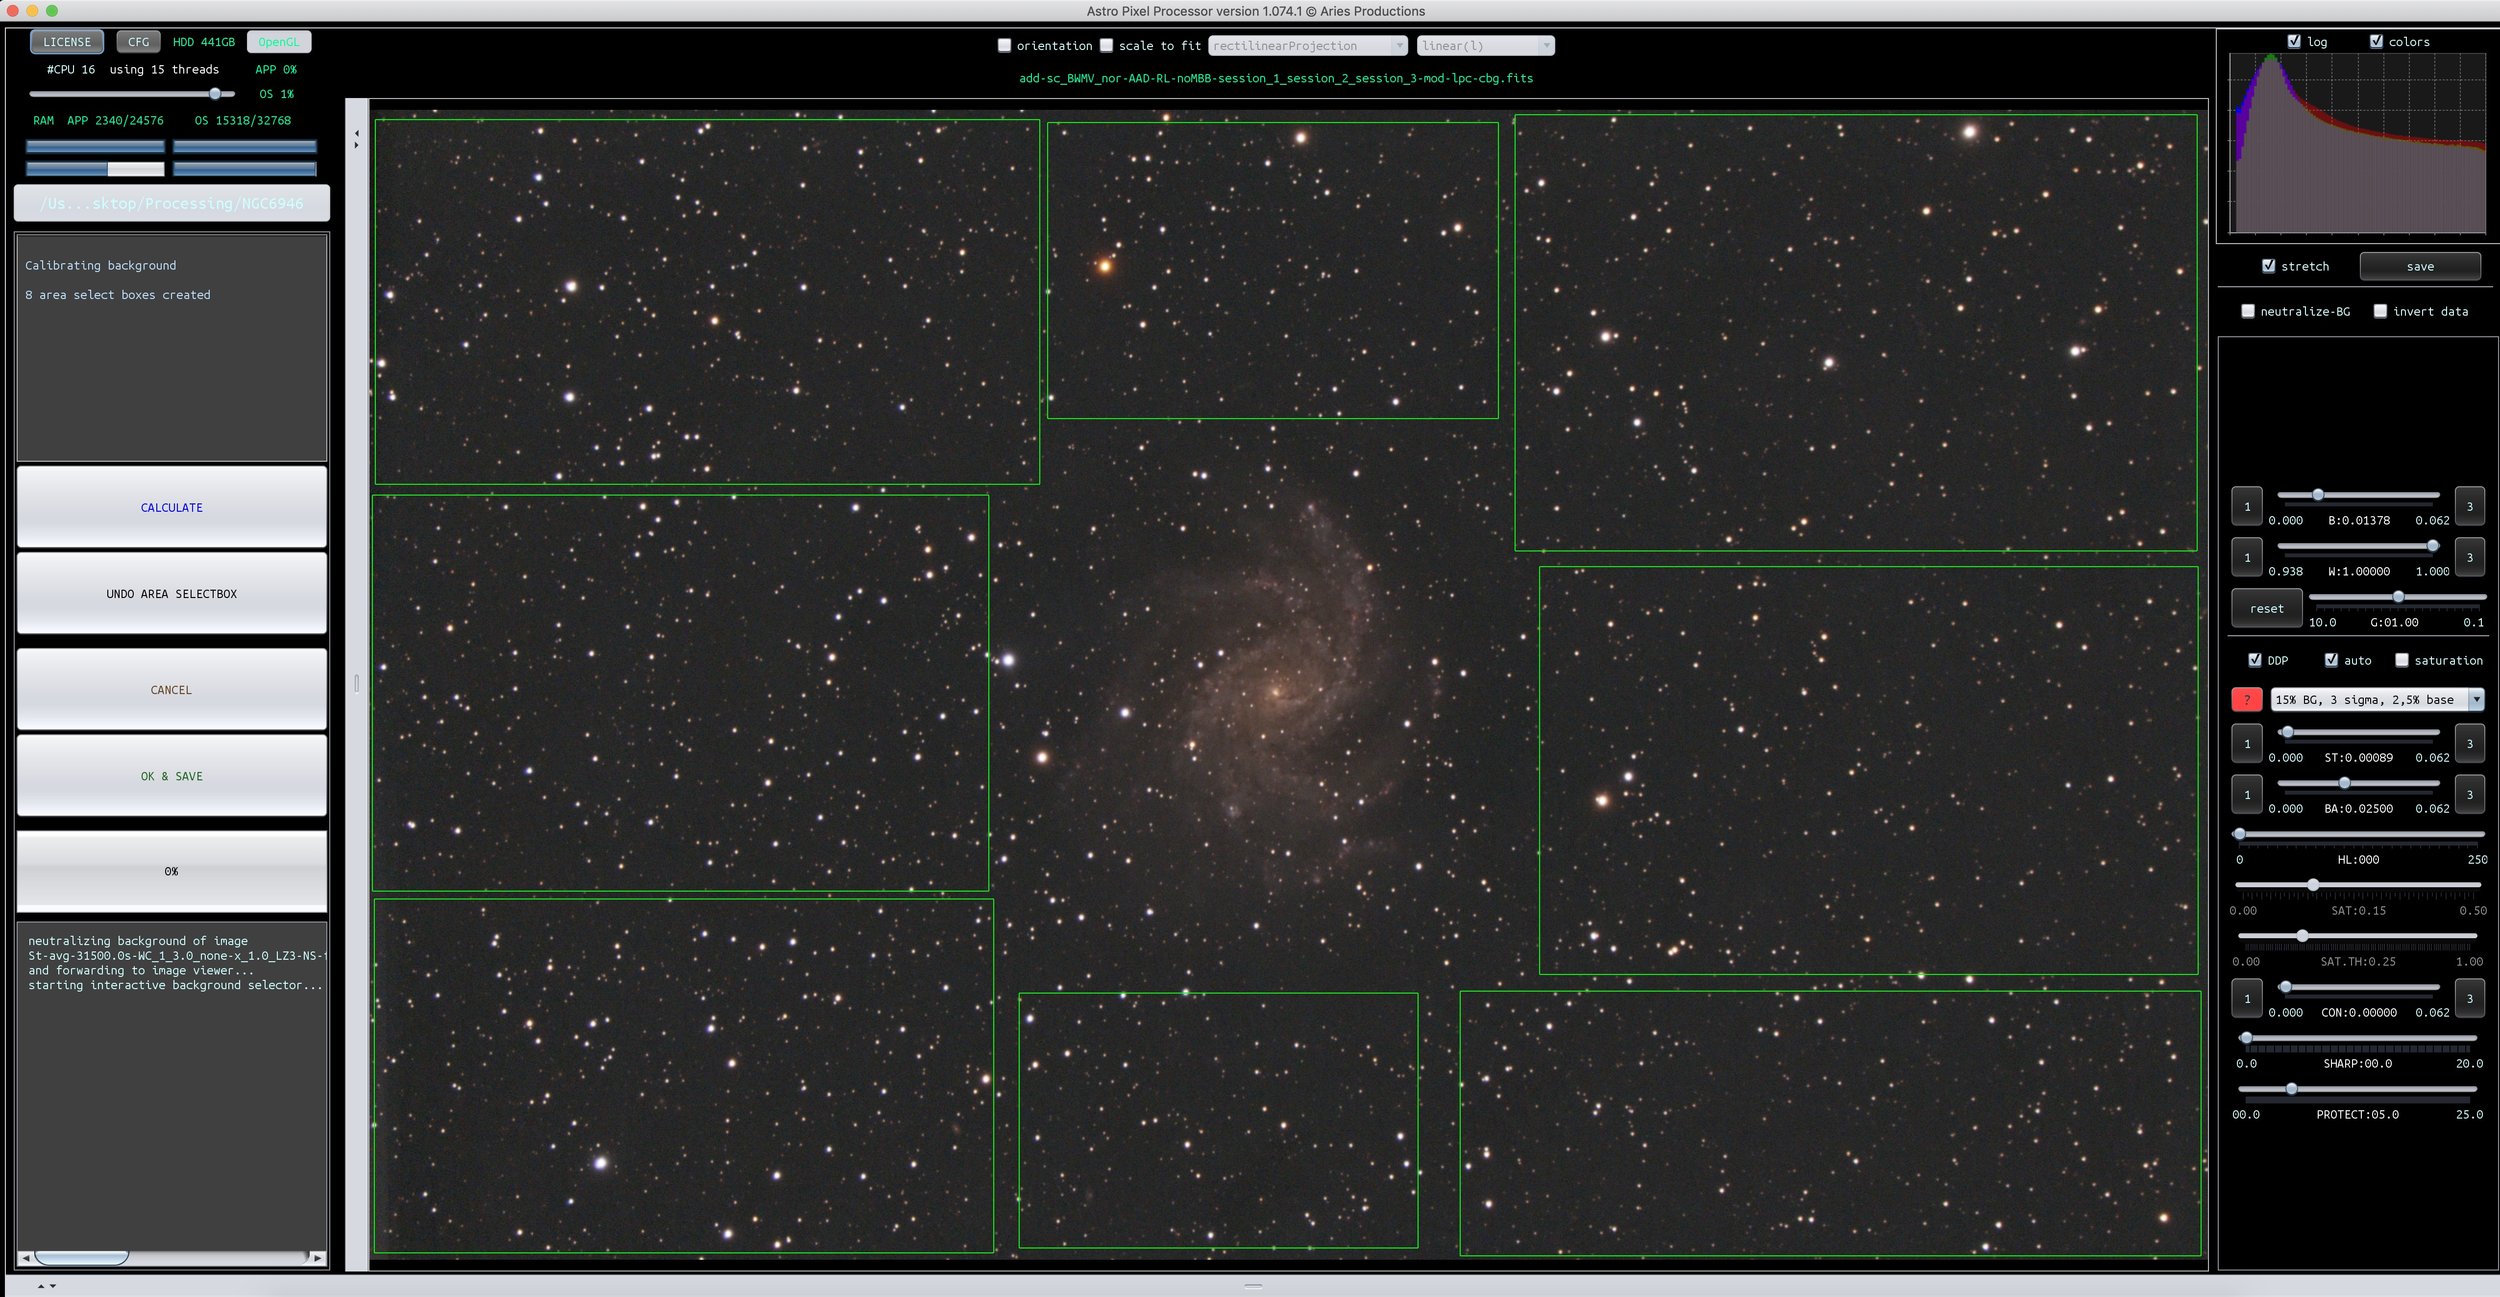
Your selections should look like the above, or very similar. Press the calculate button. You might only see the slightest change to your image, and sometimes it’s not noticeable, but the background is getting turned to a neutral color. Press the OK & Save button to create the new image.
Last, and final step, we want to color correct the stars themselves. APP stores known color values for stars, so it knows what color ranges to expect. It color corrects the overall image by bringing those star colors in line with the actual colors of the stars. Select your background corrected image, double click it, and press Calibrate Star Colors in the tools menu.
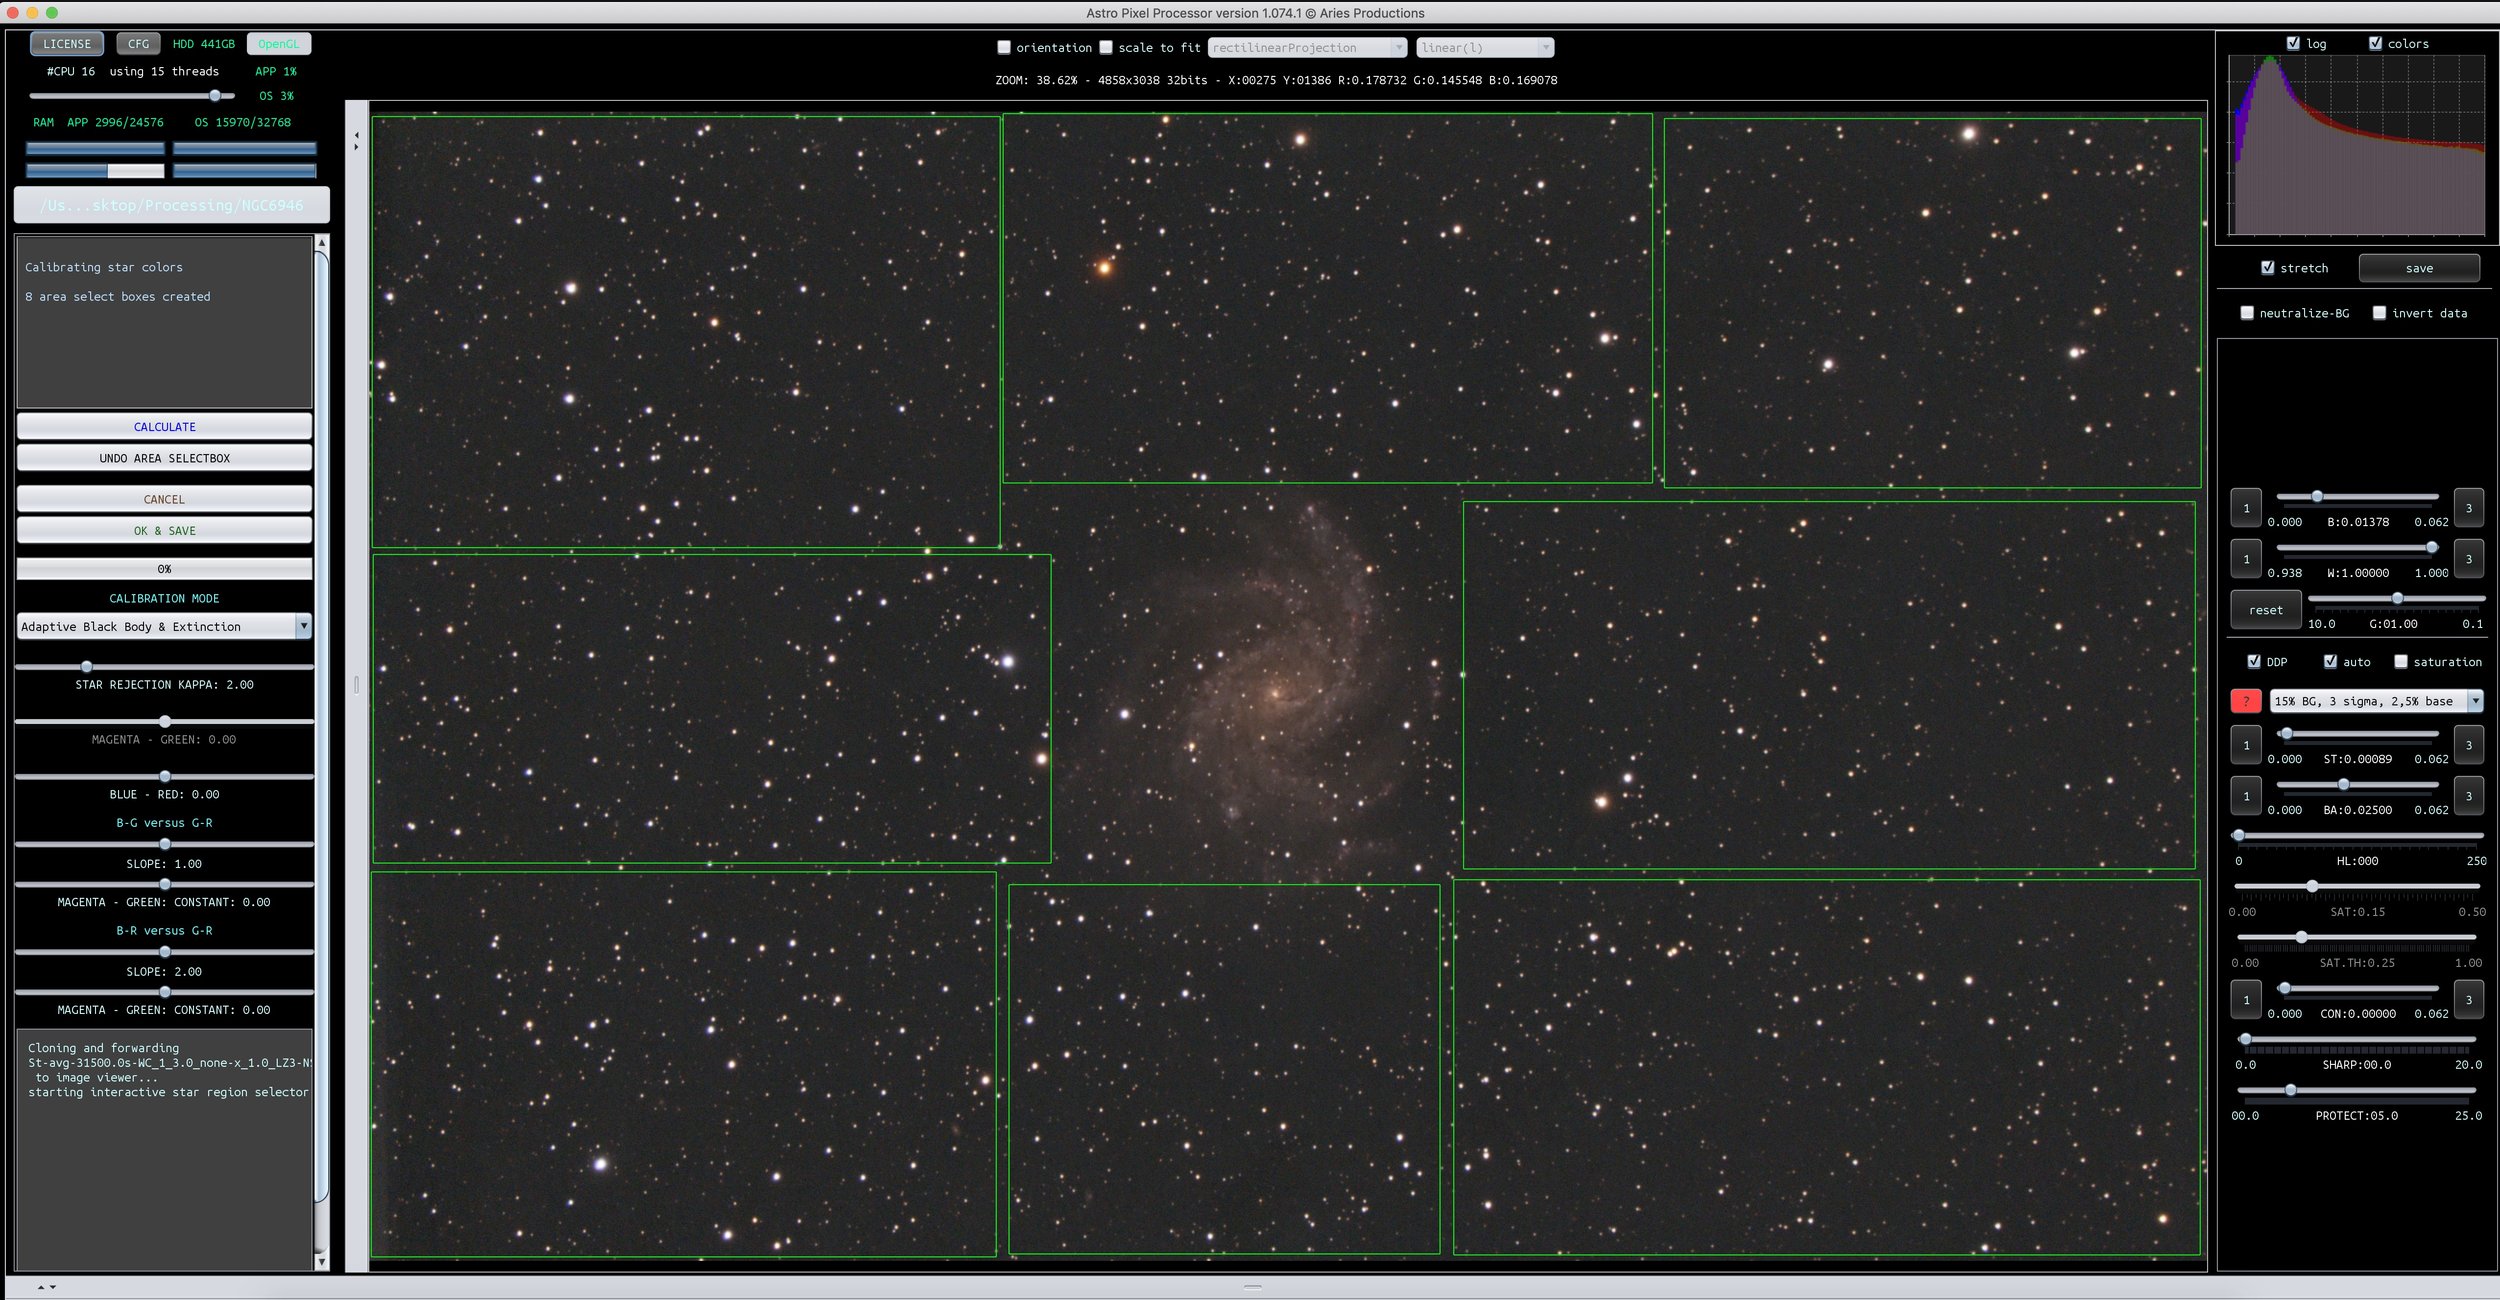
This selection will look very similar to your background selection. Select all stars in your image, avoiding the primary subject. Once you’re happy with the selection, press calculate.

Now you’ll see a graph plotted showing the red and blue stars within your image before and after the correction. You can see I had some serious outliers in the top graph, now they’re brought more in line with expected star colors, and my galaxy has now lost the yellow color cast that it had. Press OK & Save to save out your calibrated image.

That’s it. You’re done. You’ve managed to stack, calibrate, and color correct your images from multiple sessions. You should have a pretty good looking image at this point. I certainly do. But, at the very top of this post, you can see my final galaxy image. It’s not quite the same. The one at the top looks a lot better. That is where post processing comes into play. I’ve basically prepped my image in APP so that I can now begin the difficult part of processing the image to make it look as good as possible. At this point in my workflow, I take the calibrated image, and move it into PixInsight to start the next part of the process. I will detail that in a different tutorial.